
Why Your Order Blocks Keep Failing (Grade Them Like a Prop Desk)
Introduction: The Order Block Isn't Broken. Your Filter Is.
You mark the order block. Price returns to it exactly as expected. You enter. And then it fails — not with a slow bleed, but with a sharp, decisive move straight through your stop.
This isn't bad luck. It's a filtering problem.
Retail traders mark order blocks the way they mark support and resistance: visually, reactively, and after the fact. Any candle that precedes a move up or down gets labeled an "order block," regardless of what actually happened at that price. The result is a chart with a dozen zones fighting for relevance, most of which were never institutional footprints in the first place.
Institutional and prop desks don't operate this way. They don't ask "did price move from here?" They ask a narrower, harder question: "did size enter here, and is there evidence it hasn't been fully absorbed?" That distinction — between a candle that merely precedes a move and a candle that represents unfilled institutional interest — is the entire gap between an order block that holds and one that fails.
This post breaks down that filtering logic in full, and shows how the Automated Order Blocks tool applies it on every timeframe, in real time, without you eyeballing it.
The Core Logic: What an Order Block Actually Represents
The Definition Retail Skips
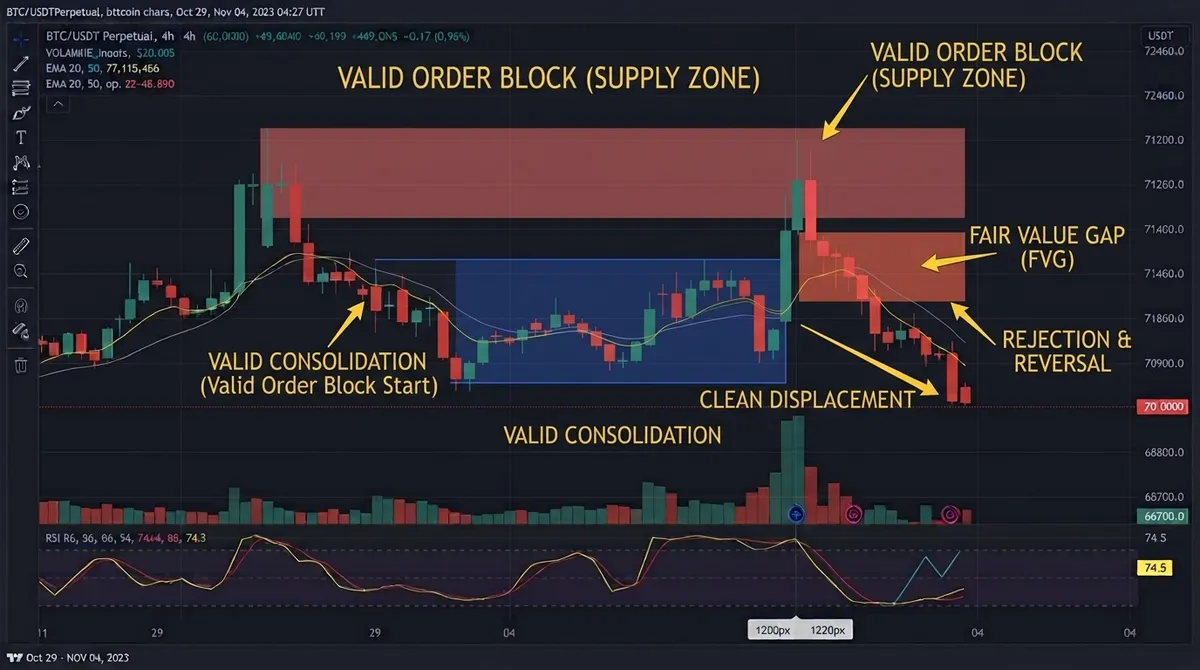
An order block is not "the candle before the move." That definition is too loose to be tradeable. A valid order block is the last opposing candle in a consolidation before an impulsive leg that produces a Break of Structure (BOS) or Change of Character (CHoCH) — and critically, one that large participants have not yet finished filling.
Three conditions separate a real order block from noise:
1. It must originate from genuine consolidation, not trend continuation. Institutions build size where price is quiet, not where it's already trending. A candle inside an established trend that happens to precede a small pullback is not an order block — it's continuation. The zone needs to show a pause: overlapping candles, contracting range, indecision.
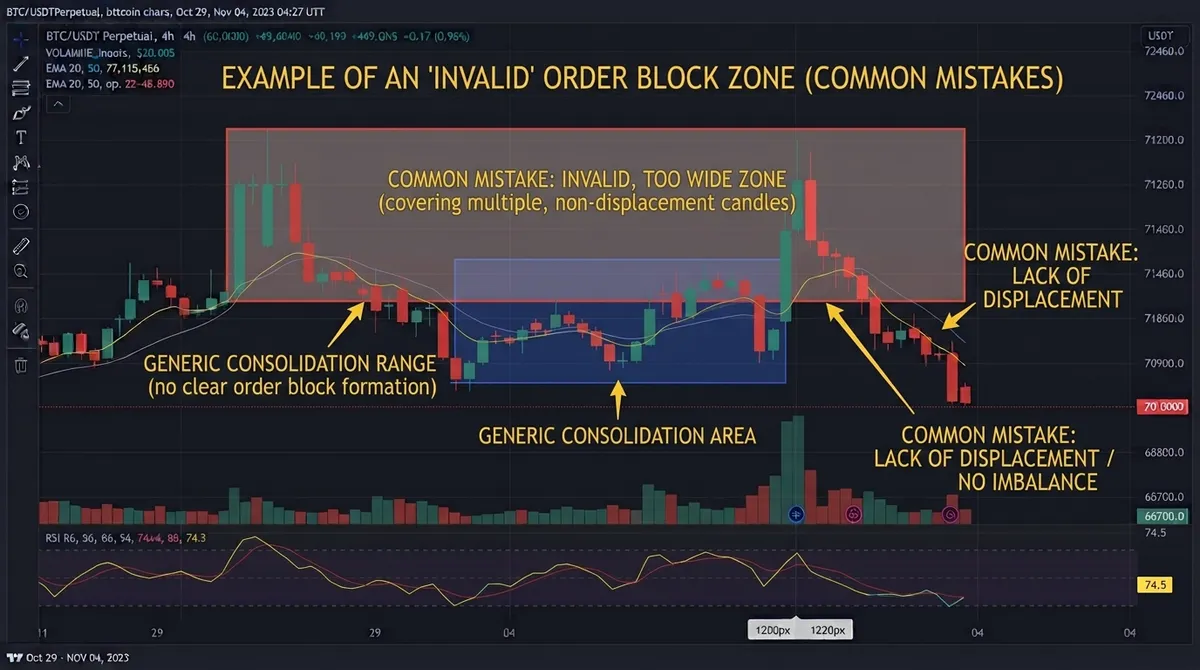
2. It must be followed by displacement, not drift. Displacement is the signature of committed capital — a candle (or short sequence) that moves fast, with minimal overlap between consecutive candles, and enough force to break the prior structure. Slow, corrective, choppy movement away from the zone is not displacement, and a "order block" without displacement behind it is just a random candle that got lucky once.
3. It must leave an imbalance. Real displacement moves price so quickly that the opposite side of the market can't provide enough liquidity to absorb it gradually. This leaves a Fair Value Gap — a visible void in the three-candle sequence. An order block without an accompanying FVG is a weaker signal; the two together are what confirm that size entered with urgency, not size that trickled in.
Why Price Returns to the Zone
The zone isn't magnetic because of chart geometry. It's magnetic because of unfinished business. Institutions building a large position cannot fill it in a single print without moving price against themselves. When displacement occurs before the position is fully built, resting orders remain at the original zone. Price returning to that level isn't "testing support" in the retail sense — it's the market revisiting a price where real, unexecuted institutional interest still sits.
This is also why an order block that has already been "mitigated" — meaning price has returned to it once and reacted — carries less weight on a second visit. The unfilled orders that made the zone significant have, at least partially, already been filled.
Why Most Retail Order Blocks Fail
They fail for one of three repeatable reasons:
- No liquidity sweep before entry. If nearby equal highs/lows haven't been swept, the move often lacks the fuel for continuation — the entry is taken before the market has cleared the stops it needs to trigger to keep moving.
- Zone drawn too wide. Marking an entire consolidation as "the order block" instead of the single last opposing candle destroys your risk-to-reward and increases the odds you're inside noise, not the actual institutional print.
- No higher-timeframe context. An order block on a 5-minute chart that contradicts the 4-hour trend is a low-probability countertrend bet dressed up as an institutional concept.
The Bridge: How Automated Order Blocks Applies This Logic For You
Manually applying all three filtering conditions — consolidation context, displacement quality, imbalance confirmation — on every timeframe, on every asset, in real time, is not realistic to do by eye across a full watchlist. This is precisely the gap Automated Order Blocks is built to close.
Why this matters specifically for order blocks (not indicators generally): order block validity is a multi-factor judgment — structure, displacement, imbalance, freshness — not a single-value calculation like an oscillator. A tool that just draws a box around "the candle before a move" replicates the retail mistake at machine speed. The value of automation here is only real if the tool is scoring the same conditions a discretionary institutional trader would check by hand.
Automated Order Blocks applies a structured scoring approach to every candidate zone:
- Structure confirmation — the zone is only flagged if it produced a genuine BOS/CHOCH, not incidental movement.
- Displacement quality — the impulsive leg following the zone is measured for speed and candle overlap, filtering out slow, corrective moves that don't qualify.
- Imbalance confluence — zones with an accompanying Fair Value Gap are weighted higher than zones without one.
- Freshness tracking — every zone is marked as untested or mitigated, so you're not trading a level that's already partially filled.
- Multi-timeframe alignment — zones are cross-checked against higher-timeframe bias, so a low-timeframe signal that contradicts the dominant trend is flagged rather than presented as equal-weight to one that agrees with it. The same hierarchy problem, applied to trend direction itself rather than individual zones, is covered in why your multi-timeframe analysis keeps contradicting itself.
The result isn't "more order blocks on your chart." It's fewer, better-qualified ones — the same reduction a prop desk trader makes manually, applied consistently instead of selectively.
Execution: How to Read the Indicator on Your Chart
- Check the grade before the location. A high-grade zone at a slightly less "perfect" price level is a better trade than a low-grade zone sitting exactly where you wanted one. Let the score, not your bias, decide whether the zone is tradeable.
- Confirm freshness before entry. An untested zone carries more weight than a mitigated one. If the tool shows the zone has already been tapped once, treat any second reaction as lower-probability unless it's reinforced by a new liquidity sweep.
- Read the multi-timeframe flag before sizing. A zone aligned with higher-timeframe bias justifies standard position sizing. A zone flagged as countertrend to the higher timeframe should either be skipped or sized down — it's a lower-probability, faster-invalidation setup by nature.
Frequently Asked Questions
What timeframe works best for order blocks?
Higher timeframes (H4, Daily) produce more reliable zones because the consolidation and displacement they capture reflect more significant participation. Lower timeframes are best used for refining entries inside a zone already validated on a higher timeframe — not for finding standalone setups in isolation.
Why did price break through my order block instead of reversing?
Most commonly, this happens when the zone lacked genuine displacement (it wasn't backed by committed, aggressive movement), or when it was drawn too wide and price simply moved through the noise inside it rather than reacting at the true institutional print. A missing liquidity sweep beforehand is the second most common cause.
Do order blocks work the same way in crypto as in forex or stocks?
The underlying logic — unfilled institutional orders leaving a footprint before displacement — applies across all liquid markets. Crypto's 24/7 trading and higher volatility mean zones can form and invalidate faster, and sessions are less clearly defined, which makes automated freshness tracking and multi-timeframe filtering more useful than in markets with fixed trading hours.
Ready to Trade Like the Desk, Not the Crowd?
Grading order blocks by hand — structure, displacement, imbalance, freshness, timeframe alignment — is exactly the kind of repetitive, high-precision work that should never be left to eyeballing a chart.
Ready to implement this institutional logic? Deploy the Automated Order Blocks on your charts now.